2017/08/31(木)C++で気軽にリアルタイムグラフ表示 (matplotlib.hpp)
動機
日頃、C++でいろいろ計算していて、計算結果をグラフにしたいことがよくあります。テキストで吐かせて、必要ならば加工して、gnuplotで表示というのが定番でしょうか。最近はpythonで動くmatplotlibを使うことも多いです。計算が終わってからグラフにするならこれでいいのでしょうが、計算中に現在の状況をリアルタイムに見たい、ということもあります。30年前のBASICの時代なら、LINE (0,0)-(639,399)とかすればすぐに画面に線が出たので、こういうのがとても気軽に出来ましたが、今はなかなか面倒な気がします。誰もがOpenGLでさっと書ける、というわけにはいかないでしょう。
これを実現する方法として、あまり知られていませんがgnuplotをパイプで繋いでリアルタイム描画させる方法があります。例えば、「C言語でgnuplotを利用してグラフ表示」に例があります。kvライブラリにもひっそりとgnuplotを使ったライブラリが含まれています。しかし、この方法は描画するオブジェクトが増えると非常に遅くなってしまい、実用的とは言い難いものでした。
gnuplotでなくmatplotlibならいくらか速そうなので、それで出来ないかと以前から考えていました。で、pythonインタプリタをパイプで繋いでpythonコマンドを文字列で送り込む作戦で作ってみました。作ってみたら案外良さそうなので記事にしました。kvライブラリにも入れようかな。
プログラム
作ったファイルは一つ(matplotlib.hpp)です。
#ifndef MATPLOTLIB_HPP
#define MATPLOTLIB_HPP

#include <cstdio>

class matplotlib {
	FILE *p;

	public:

	bool open() {
		p = popen("python -c 'import code; import os; import sys; sys.stdout = sys.stderr = open(os.devnull, \"w\"); code.InteractiveConsole().interact()'", "w");
		if (p == NULL) return false;
		send_command("import matplotlib.pyplot as plt");
		send_command("import matplotlib.patches as patches");
		send_command("fig, ax = plt.subplots()");
		send_command("plt.show(block=False)");
		return true;
	}

	bool close() {
		send_command("plt.close()");
		send_command("quit()");
		if (pclose(p) == -1) return false;
		return true;
	}

	void screen(double x1, double y1, double x2, double y2, bool EqualAspect = false) const {
		if (EqualAspect == true) {
			fprintf(p, "ax.set_aspect('equal')\n");
		}
		fprintf(p, "plt.xlim([%.17f,%.17f])\n", x1, x2);
		fprintf(p, "plt.ylim([%.17f,%.17f])\n", y1, y2);
		fprintf(p, "plt.draw()\n");
		fflush(p);
	}

	void line(double x1, double y1, double x2, double y2, const char *color = "blue", const char *opt = "") const {
		fprintf(p, "ax.draw_artist(ax.plot([%.17f,%.17f],[%.17f,%.17f], color='%s', %s)[0])\n", x1, x2, y1, y2, color, opt);
		fprintf(p, "fig.canvas.blit(ax.bbox)\n");
		fprintf(p, "fig.canvas.flush_events()\n");
		fflush(p);
	}

	void point(double x, double y, const char *color = "blue", const char *opt = "") const {
		fprintf(p, "ax.draw_artist(ax.scatter([%.17f],[%.17f], color='%s', %s))\n", x, y, color, opt);
		fprintf(p, "fig.canvas.blit(ax.bbox)\n");
		fprintf(p, "fig.canvas.flush_events()\n");
		fflush(p);
	}

	void rect(double x1, double y1, double x2, double y2, const char *edgecolor = "blue", const char *facecolor = NULL, const char *opt = "") const {

		if (facecolor == NULL) {
			fprintf(p, "ax.draw_artist(ax.add_patch(patches.Rectangle(xy=(%.17f,%.17f), width=%.17f, height=%.17f, fill=False, edgecolor='%s', %s)))\n", x1, y1, x2-x1, y2-y1, edgecolor, opt);
		} else {
			fprintf(p, "ax.draw_artist(ax.add_patch(patches.Rectangle(xy=(%.17f,%.17f), width=%.17f, height=%.17f, fill=True, edgecolor='%s', facecolor='%s', %s)))\n", x1, y1, x2-x1, y2-y1, edgecolor, facecolor, opt);
		}
		fprintf(p, "fig.canvas.blit(ax.bbox)\n");
		fprintf(p, "fig.canvas.flush_events()\n");
		fflush(p);
	}

	void ellipse(double cx, double cy, double rx, double ry, const char *edgecolor = "blue", const char *facecolor = NULL, const char *opt = "") const {
		if (facecolor == NULL) {
			fprintf(p, "ax.draw_artist(ax.add_patch(patches.Ellipse(xy=(%.17f,%.17f), width=%.17f, height=%.17f, fill=False, edgecolor='%s', %s)))\n", cx, cy, rx*2, ry*2, edgecolor, opt);
		} else {
			fprintf(p, "ax.draw_artist(ax.add_patch(patches.Ellipse(xy=(%.17f,%.17f), width=%.17f, height=%.17f, fill=true, edgecolor='%s', facecolor='%s', %s)))\n", cx, cy, rx*2, ry*2, edgecolor, facecolor, opt);
		}
		fprintf(p, "fig.canvas.blit(ax.bbox)\n");
		fprintf(p, "fig.canvas.flush_events()\n");
		fflush(p);
	}

	void circle(double cx, double cy, double r, const char *edgecolor = "blue", const char *facecolor = NULL, const char *opt = "") const {
		ellipse(cx, cy, r, r, edgecolor, facecolor, opt);
	}

	void polygon(double *x, double *y, int n, const char *edgecolor = "blue", const char *facecolor = NULL, const char *opt = "") const {
		int i;

		fprintf(p, "ax.draw_artist(ax.add_patch(patches.Polygon((");
		for (i=0; i<n; i++) {
			fprintf(p, "(%.17f,%.17f),", x[i], y[i]);
		}

		if (facecolor == NULL) {
			fprintf(p, "), fill=False, edgecolor='%s', %s)))\n", edgecolor, opt);
		} else {
			fprintf(p, "), fill=True, edgecolor='%s', facecolor='%s', %s)))\n", edgecolor, facecolor, opt);
		}
		fprintf(p, "fig.canvas.blit(ax.bbox)\n");
		fprintf(p, "fig.canvas.flush_events()\n");
		fflush(p);
	}

	void save(const char *filename) const {
		fprintf(p, "plt.savefig('%s')\n", filename);
		fflush(p);
	}

	void send_command(const char *s) const {
		fprintf(p, "%s\n", s);
		fflush(p);
	}

	void clear() const {
		send_command("plt.clf()");
	}
};

#endif // MATPLOTLIB_HPP
以下は簡単なテストプログラム(test-matplotlib.cc)。
#include "matplotlib.hpp"

int main()
{
	matplotlib g;

	// initialize
	g.open();

	// set drawing range
	g.screen(0, 0, 10, 10);
	// aspect ratio = 1
	// g.screen(0, 0, 10, 10, true);

	g.line(1,1,3,4);
	g.line(1,2,3,5, "red");

	g.rect(4,6,5,8);
	g.rect(6,6,7,8, "green");
	g.rect(8,6,9,8, "black", "red");

	g.point(4,2);
	g.ellipse(8,2,2,1);
	g.circle(2,8,2);

	double xs[5] = {6., 7., 6., 5., 5.};
	double ys[5] = {4., 5., 6., 6., 5.};
	g.polygon(xs, ys, 5, "black", "yellow");

	g.line(1,3,3,6, "green", "alpha=0.2");
	g.line(1,4,4,5, "black", "alpha=0.5, linestyle='--'");
	g.point(4, 3, "red", "s=100");

	g.save("test.pdf");

	getchar();

	// finish drawing
	g.close();
}
普通にコンパイルして走らせると、matplotlibが使えるpythonがインストールされていれば、のように表示されます。非常に短いプログラムなのでソースを見るのが早いような気もしますが、以下、簡単に使い方を説明します。
基本
#include "matplotlib.hpp"

int main()
{
	matplotlib g;

	g.open();
	g.close();
}
これが最小限でしょうか。matplotlib.hppをインクルードし、matplotlibオブジェクトgを一つ作り、g.open()でウィンドウが開き、gに対していろいろ描画命令を発行し、g.close()でウィンドウを閉じます。描画範囲
g.screen(0, 0, 10, 10);で、描画範囲を(x,y)=(0,0)と(x,y)=(10,10)を対角線とする領域に設定しています。
g.screen(0, 0, 10, 10, true);のようにすると、x座標とy座標のアスペクト比が1になります(正方形が正方形に描画される)。
線分
g.line(1,1,3,4);のようにすると点(1,1)から点(3,4)へ線分が引かれます。
g.line(1,2,3,5, "red");のように色を指定することも出来ます。色の指定方法は、"Specifying Colors"で詳細を見ることが出来ます。
長方形
g.rect(4,6,5,8);で、点(4,6)、点(5,8)を対角線とする長方形が描かれます。線分と同様に、
g.rect(6,6,7,8, "green");で色を指定できます。
g.rect(8,6,9,8, "black", "red");のように色を2つ指定すると、一つ目の色で枠線が描かれ、二つ目の色で中が塗りつぶされます。
点
g.point(4,2);(4,2)に点が打たれます。線分と同様に色を付けることも出来ます。
楕円
g.ellipse(8,2,2,1);中心が(8,2)、x方向の半径が2、y方向の半径が1であるような楕円を描画しています。長方形と同様に色を付けたり塗りつぶしたり出来ます。
円
g.circle(2,8,2);中心が(2,8)、半径が2の円を描画しています。長方形と同様に色を付けたり塗りつぶしたり出来ます。
多角形
	double xs[5] = {6., 7., 6., 5., 5.};
	double ys[5] = {4., 5., 6., 6., 5.};
	g.polygon(xs, ys, 5, "black", "yellow");
点(6,4),(7,5),(6,6),(5,6),(5,5)をこの順に結んだ五角形を表示しています。長方形と同様に色を付けたり塗りつぶしたり出来ます。ファイルにセーブ
g.save("test.pdf");
このように、その時点での画像をファイルにセーブできます。ファイル形式は拡張子で指定します。画面消去
g.clear()で画面消去できます。座標系の設定もクリアされるようで、g.screen()からやり直す必要がありそう。追加オプション
	g.line(1,3,3,6, "green", "alpha=0.2");
	g.line(1,4,4,5, "black", "alpha=0.5, linestyle='--'");
	g.point(4, 3, "red", "s=100");
matplotlibには、線の種類や線の太さなど、更に無数のオプションがあります。それらを全て引数として用意するのは面倒だったので、最後の引数に文字列で書くとそれがそのままmatplotlibの該当コマンドのオプションとして渡されるようにしました。上の例は、
- alpha=0.2として薄く表示
- alpha=0.5として、更に線種を変更
- 点を大きく
技術的な細かいこと
- 最初にpopenしてるところ、単にpythonインタプリタを呼ぶのでなく妙な引数がついてますが、自分の環境ではpythonインタプリタをそのまま呼んだ場合標準入力を一行ずつ読んでくれなかったので、小細工しました。もっとスマートな方法募集中です。
- 普通に書くと新しく何かを描画する毎に全体を再描画してしまいgnuplotと同様遅くなってしまったので、blittingとかいう技を使って再描画を抑制しているつもりです。しかし、matplotlibの構造を全く知らずに適当に実験しながら作ったので、とんでもなく的外れなことをしているかもしれません。
- C++とlibpythonをリンクしてpythonインタプリタ自身をプログラム中に取り込んでしまう方法でも同じことが出来ます。しかし、コンパイル時のオプションが必要だったり気軽さが失われてしまうのと、描画の重さに比べてパイプのオーバーヘッドはあまり大きく無さそうなので、気軽なパイプで作ってみました。
オマケ
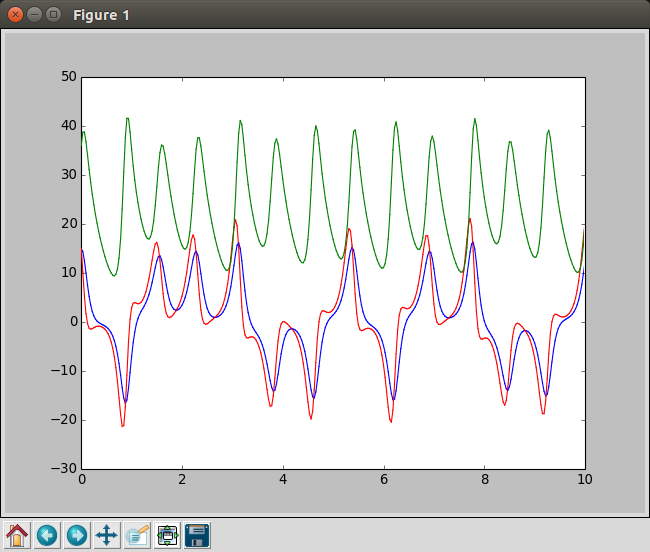
最後にオマケでLorezn方程式の初期値問題の解を計算しながら描画する例です。boost.ublasを使っています。
#include <boost/numeric/ublas/vector.hpp>
#include "matplotlib.hpp"

namespace ub = boost::numeric::ublas;

template <class T, class F>
void rk(F f, ub::vector<T>& init, T start, T end) {

	ub::vector<T> x, dx1, dx2, dx3, dx4, x1, x2, x3;

	T t = start;
	T dt = end - start;

	x = init;
	dx1 = f(x, t) * dt;
	x1 = x + dx1 / 2.;
	dx2 = f(x1, t + dt/2.) * dt;
	x2 = x + dx2 / 2.;
	dx3 = f(x2, t + dt/2.) * dt;
	x3 = x + dx3;
	dx4 = f(x3, t + dt) * dt;

	init = x + dx1 / 6. + dx2 / 3. + dx3 / 3. + dx4 / 6.;
}

struct Lorenz {
	template <class T> ub::vector<T> operator() (const ub::vector<T>& x, T t){
		ub::vector<T> y(3);

		y(0) = 10. * ( x(1) - x(0) );
		y(1) = 28. * x(0) - x(1) - x(0) * x(2);
		y(2) = (-8./3.) * x(2) + x(0) * x(1);

		return y;
	}
};

int main()
{
	int i, j;
	ub::vector<double> x, x_new;
	double t, t_new, dt;
	const char *colors[3] = {"blue", "red", "green"};

	matplotlib g;

	g.open();

	g.screen(0., -30., 10., 50.);

	x.resize(3);
	x(0) = 15.; x(1) = 15.; x(2) = 36.;
	t = 0.;
	dt = pow(2., -5);

	for (i=0; i < (1 << 5) * 10; i++) {
		x_new = x;
		t_new = t + dt;
		rk(Lorenz(), x_new, t, t_new);
		for (j=0; j<3; j++) {
			g.line(t, x[j], t_new, x_new[j], colors[j]);
		}
		x = x_new;
		t = t_new;
	}

	getchar();
	g.close();
}
これを実行すると、のようなグラフが計算しながら描かれます。
おわりに
短いのでコピペでも十分でしょうけど、ここに載せた3つのプログラムをzipであげておきます。matplotlib.zip
見れば分かるように単純なことしかしていませんので、C++以外の他の言語でも似たようなことは簡単に出来ると思います。
お役に立てば幸いです。

